
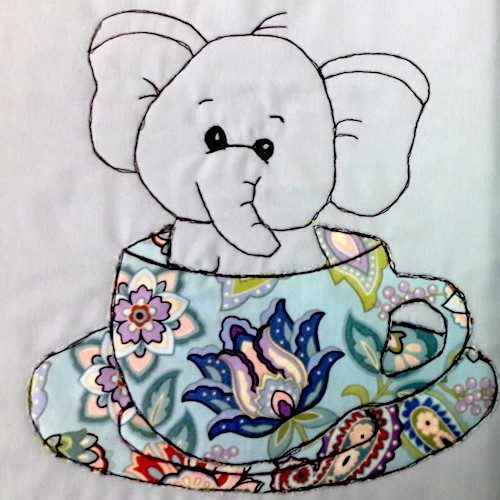
Free Motion Elephant
By Sukhbeer Dryden
What is free motion embroidery?
Free motion is the best thing ever established. The word ‘free’ means exactly that, you are free to direct your fabric in whichever direction you want to go.
You determine the pattern and what you are stitching, not the machine. Free motion can be done on nearly any kind of fabric from natural to synthetic fabrics.
Feet:
The other item you will require is an embroidery foot, also known as darning foot. This foot allows you to sew freely in all different directions, through as many layers of fabric you can fit under the foot.
So, drop your feed dog change your stitch length to ‘0’ (this is not always necessary, but it allows me to remember to set my machine back when I finish) and attach the free motion embroidery foot.

Instruction on creating the free motion elephant
Enlarge the image to your desired size and trace your image onto a piece of fabric that you would like to create your free motion embroidery. There are many ways to do this.
An air erasable pen will disappear by air eventually. Be warned that the pen may disappear before you finish working on it.
There is also washable pen, that you can wash out once you have finished your piece of work.
I have used a pen called ‘frixon’, this can be ironed off once you have finished.
N.B the ‘frixon’ pen is a pen that is not usually used for fabric, therefore you must always test it on a piece of scrap to make sure the pen ink will iron out.
Your machine should now be set up for free motion embroidery.

Now to stitch
Step 1
Place a piece of stabilizer under your fabric panel and place on the machine under the embroidery foot. The stabilizer can be Stitch n Tear or wadding.
Step 2
Make sure you lower the presser foot down. Using the hand wheel, bring the bobbin thread up to the top of the fabric. Stitch on the same spot a few times to secure threads and trim excess threads once you have started stitching.
Step 3
Starting in the centre, start stitching following the pencil line. Keep your hands close to where you are stitching for easier movement. Keep your feet and hands speed coordinated.
Tip: In order to move onto the next lot of stitching, instead of stopping and cutting threads, bring needle up and slid the fabric over to where you want to stitch next. The threads can be cut away at the end.
Step 4
Free motion around all the details at least twice. This gives your image a defined look. When you are happy with your stitching, trim threads.
Step 5
At this stage, you can decide what you would like to do with the paneI. You can incorporate it into a quilt or individual projects such as cushion covers.
Have fun with free motion!
Further information
Sukhbeer Dryden, Sew n’ Beads runs workshops from her own studio at Units 4 & 5 Tilgate Park, Crawley, RH10 6SL
Facebook: sew n beads