
Circular Drawstring Pouch
By Janice Croft
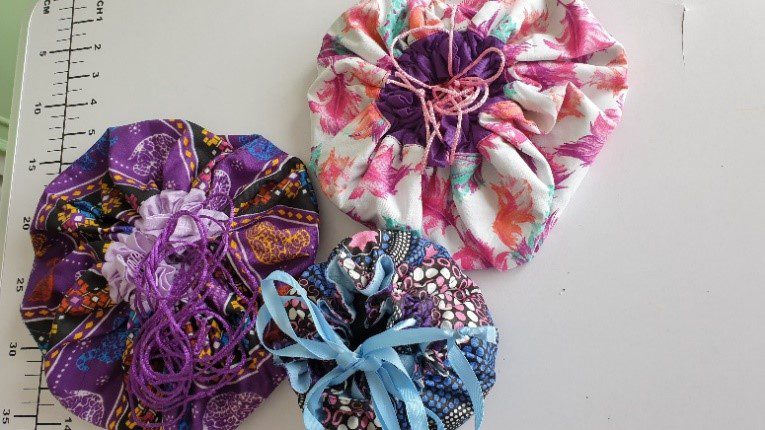
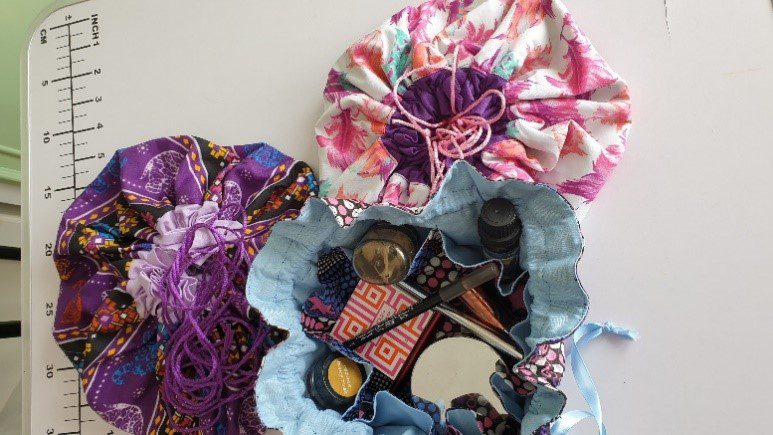
This drawstring pouch comes in many versions and sizes. In this video you’ll learn the steps to create a pouch that is unique to you and your needs. A small pocket sized one is great for a travelling sewing kit. It’s also a great teen gift filled with make up or nail grooming accessories. The medium size with pockets makes a great jewellery holder. The large size, with an internal zip and flap closure, would be perfect for large jewellery pieces or large makeup kit.
Join Janice and learn the techniques and choose what you would like in your customized pouch. You can watch this video, pause and replay as much as you like so you can master this fun project at your leisure.
What you will need
- 75cm Print fabric and mediumweight interlining
- 1m lining fabric
- 4m cord or ribbon
- 20cm zip
- 5cm of Velcro (hook and loop tape)
Preparation
Cut the fabrics as follows:
- 1 each 56cm circle from print fabric, lining, interlining.
- 2 of 13cm x 25cm flap print fabric – round one short edge
- 1 of 10cm x 25cm handle in print fabric
- 2 of 90cm x 6cm casing (contrast or lining fabric)
- 2 of 25cm x 20cm pocket lining
- 2 of 2m cord
- 5cm Velcro (hook and loop)
Watch video tutorial
Step-by-step guide
Step 1
Mark a 1cm x 18cm letterbox 4cm down from top edge of pocket lining
Step 2
Mark a line on circle lining 18cm down from top. Position pocket lining right side to right side on lining circle matching this line making sure it is central
Step 3
Stitch around the letterbox, cut through the centre, cutting into the corners. Turn through to the wrong side and press
Step 4
Position zip under the opening with glider on top. NB pin, glue or tape in place. Stitch around the edge
Step 5
Place the 2nd piece of pocket lining right side together, match top and sides. Stitch around the 3 edges leaving the bottom edge open. NB make sure the top edge is stitched next to the zip. Open zip
Step 6
Makeup flap, with right sides together stitch around 3 sides leave a short edge open. Trim, clip, turn, press and topstitch
Step 7
Make up handle, press in half lengthwise, press raw edges to the center, refold and stitch along both long edges
Step 8
With right side of fabric circle up lay the flap right side down, center the flap 10cm down. Stitch across the raw short edge. Position the handle next to the flap stitch both raw edges. Push flap through the handle Stitch again next to the handle, this hides the raw edges
Step 9
Finish the short edges of the casing by stitching a double 6mm hem. Press in half lengthwise with wrong sides together. Position casing around the edge of circle make sure the zip pocket is horizontal. The casing openings are on each side. Place fabric right side down and stitch all the way around. Trim, clip, turn through using the pocket lining opening. Press and stitch 3mm below the casing to keep everything flat
Step 10
Thread cord through the casing from the left. Second piece of cord from the right. Double pull drawstring. Knot ends, use beads if desired. Attach snap to flap and front.
About the tutor
Janice Croft
Janice Croft is a tutor from London. Her primary passions are dressmaking, pattern drafting and tailoring. She has taught at Festival of Quilts and Knitting & Stitching Shows for many years.
She has dedicated the last 23 years to passing on her skills either on a 1-2-1 basis, day classes or retreat weekends around the country. Her style is fun, student centered learning. She runs a weekly dressmaking clinic at the Sewing Rooms in Putney and retreats in Coventry and Kent.
For further information, email: [email protected]