
Top Tips for Half Square Triangles
By Mandy Munroe
Half square triangles are a basic in patchwork and are so much more enjoyable when they are accurate. Here are my top tips.

Top tips
- Using spray starch on the back of your fabric before you cut it will help stabilise the bias. Hold the can around 10” away from the fabric and cover lightly and evenly. Wait for it to sink into the weave for a few seconds, then iron on a cotton setting to explode the starch and stiffen the fibre.
- Check your ¼” foot by placing it on a ruler. Some are precision made and some are a little bit chunky. Get to know yours!
- Cutting squares rather than two triangles will contain the bias, the fabric will not stretch out as you sew and you don’t have a sharp point squirming out from under your foot! Use a sharp pencil to draw a line across the diagonal, place Right Sides together (RST) and sew an accurate ¼” either side of the line. Cut along the pencil line and you have two Half Square Triangles (HSTs).
- Use the 7/8th rule when cutting your squares – If you want a 3” square (finished) add 7/8”and cut 3 7/8”. If you want a 4” square (finished) add 7/8” and cut 4 7/8” etc.
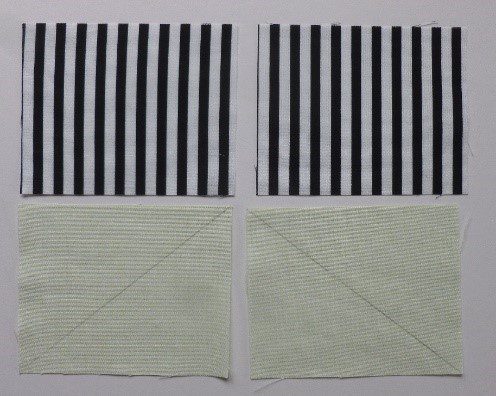
- When working with directional fabric e.g a stripe, draw your diagonal lines in opposite directions – “make a roof”. From two squares you will have the perfect combination to maintain the direction within a block.
- To keep the seam straight always set the seam with the iron before opening up your HST. Then lift one corner and press lightly bringing the nose of the iron across the seam, do not stretch out. You can always press again later once it is sewn into your block. Trim ears, no need to trim the blocks.
Great British Quilter basics by Sarah Ashford for Dashwood Studio.
Please respect copyright of these articles and projects Artists who make their living through pattern design appreciate your consideration.