
Snug and Stylish Dog Coat
By Nicholas Ball
Nick brings you the perfect project to ensure your pampered pooch is kept snug and stylish all winter long! You’ll learn how to draft a custom-fit pattern before making an easy-to-sew coat, suitable for all shapes and sizes of dog. Nick uses a topstitch foot to ensure a beautiful and professional finish.

You will need:
- Sewing machine
- Topstitch foot
- Reverse-pattern foot
- Outer fabric – we used cotton
- Inner fabric – we used polar fleece
- Wadding
- Calico
- Temporary fabric adhesive spray / basting pins
- Top stitching thread
- Sew-all thread
- Pins
- Drafting or brown craft paper
- Pencil
- Tape measure
- Ruler
- Scissors
- Rotary cutter (optional)
- Non-sew press fasteners
Measuring your dog
Step 1
Use a tape measure to record the following:
A – The circumference of your dog’s neck, from just below the collar. Add 2”.
B – The length of your dog’s back, from just below the collar to just above the base of his tail.
C – The circumference around your dog’s chest, a few inches behind his front legs.
D – The front of your dog’s chest, from the lowest point of his neck to the top of his chest, roughly in line with the top of his fore legs. This should be between 2” and 6, depending on your dog’s size.

Drafting a pattern
Step 2
- Place a portrait piece of drafting or brown craft paper on a table. Half the neck circumference (measurement A) and draw a half-oval shape this length near the top left corner of the paper
- Use a ruler to draw a straight vertical line from the lower end of the half-oval the length of your dog’s back (measurement B)
- Draw a horizontal straight line from the top end of the oval the length of front chest (measurement D)
- Place the ruler vertically at the right end of the horizontal line. Draw a vertical line the same length as the previous vertical line
- Draw around a plate from the left vertical line to the right vertical line to create a curve.
- Use a coin to round off the top two corners
- Double the horizontal width of your pattern and subtract this total from the circumference of your dog’s stomach (measurement C) to determine the length of the stomach strap. Using this measurement, draw a rectangle with a width you think would be suitable for your dog (we used 2.5”)
- Add a 3/8” seam allowance around your coat pattern, except for the centre back seam and around one short side and the two longer sides of the stomach band. Cut out.
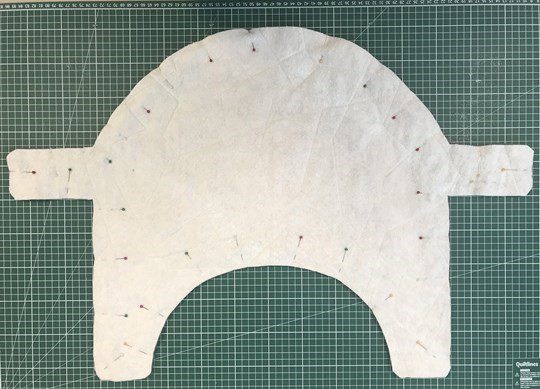
- Using the fold line on the pattern and ensure that the fabric grain is straight on the fold, cut out one of the coat pieces and one of the stomach band from calico
- Unfold the calico toile and test fit this to your dog, adjusting if needed. Position the stomach band between the fore and hind legs. Mark this position
- Transfer this marked position onto your paper pattern and tape the band to the coat piece. Your pattern is now complete
To make
Step 3
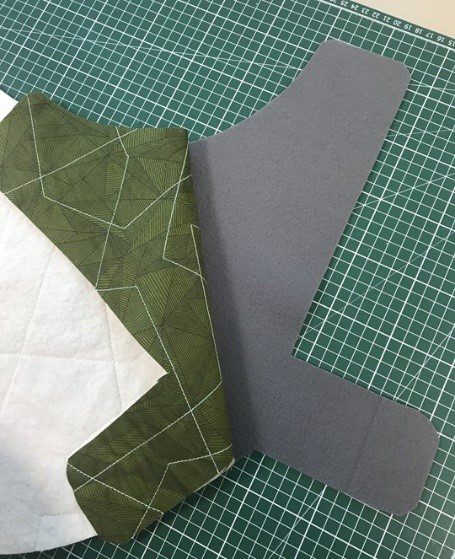
Place a piece of your outer fabric that is larger than your FULL coat pattern piece by at least 2” in all directions on top of a piece of cotton wadding the same size. Use temporary fabric adhesive spray or basting pins along the outer edge to hold the layers together. Place your pattern on top and draw around it using chalk, adding an extra 2”. This will be a guide to show you where to quilt.

Step 4
Thread the top of your machine with cordonnet or topstitch thread and use a medium weight thread (40 – 24wt) in the bobbin. Attach topstitch foot to your machine.
Step 5
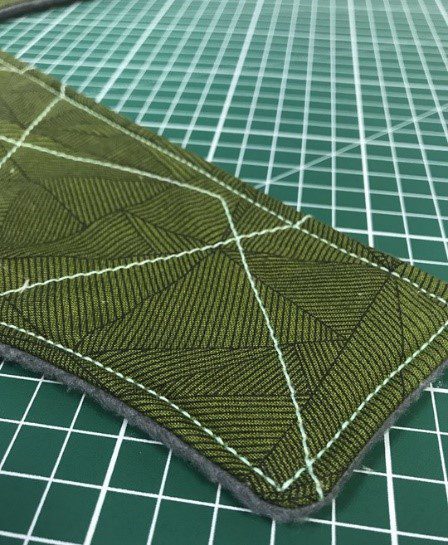
Stitch through the layers, stitching only up to the chalk line. Everything else will be trimmed away. We used the lines on our outer fabric as a guide. Feel free to add as much or as little stitching as you like.

Step 6
Once the layers have been quilted, fold the stitched fabric piece in half, ensuring that the fabric grain is straight on the fold, place you pattern piece along the fold, pin in to position and cut out. We found it easiest to use a rotary cutter for this step.

Step 7
Cut out a second piece from your inner fabric.

Step 8
Pin the outer and inner pieces together, right sides together.
Step 9
Using a 3/8” seam and a reverse-pattern foot, sew together, leaving an area approximately 6” unsewn for turning out.

Step 10
Clip the curves and trim the corners to reduce bulk. Turn the coat right side out through the unstitched opening. Take the time to ensure the edges are as flat as possible. Fold the seam allowance of the opening in and pin in place.

Step 11
Attach top stitch foot. Align the edge of the coat with the edge of the presser foot and sew a line of top stitching around the entire edge of the coat, closing the opening as you do so.
Step 12
Fit the coat to your dog and wrap the stomach flaps under. Use a fabric pen to mark the position of the press fasteners. Repeat for the chest flaps, ensuring that both sets of flaps overlap enough to keep the coat secure but not so much that they are too tight and uncomfortable for your dog.

Step 13
Attach the press fasteners to the coat at the marked position following the manufacturer’s instructions.
Your dog coat is now finished and your pampered pooch should be as snug as a bug in a rug!

Smart ideas
For extra weather-proofing, use a water-resistant fabric, such as windbreaker nylon, for the outer fabric. Avoid adding extra topstitching detail to this type of fabric. Just topstitch around the edge after the layers have been sewn together and turned out.
The coat can be personalized in many ways. Sew strips of reflective tape to the outer fabric to make your dog more visible at night. Use your machine’s monogramming or embroidery features to add a name tag, add pockets to the coat to keep doggy bags in for those long country walks…the list of possibilities goes on and on!
Further information
Nicholas’ project is produced on behalf of Bernina. For more projects from Bernina visit them on Facebook, Instagram or Twitter @berninauk.