
Baby Birthday Mini Quilt
By Nicholas Ball
Nicholas shows you how to create a beautiful quilt for a baby. He designs the quilt using Patchwork Foot #97 and Bernina Quilting Foot #29 to stitch around lettering and decorate by free motion quilting. This project requires you to get creative and really express yourself! We hope the special little one that you make it for really loves and cherishes their mini quilt.

You will need:
- Sewing machine
- A range of fabric strips for the log cabin blocks, from ¾” to 1 ½” wide
- Scraps of coloured fabric for the appliqué
- Backing fabric approximately 22” x 22”
- Wadding approximately 22” x 22”
- Binding fabric – ¼ meter
- Fusible web, such as Bondaweb or Steam-a Seam
- Fabric basting spray
- Thread
- Rotary cutter, scissors
- Cutting mat, 6.5” patchwork ruler (optional)
- Free motion quilting foot
- Patchwork foot
Step 1
To make up
Begin by making a pieced background for the appliqué. This is constructed from 9 improv log cabin blocks that don’t use precise measurements and are quick and easy to make. Take a square of fabric approximately 2”, cut a strip of fabric a little longer than the square and attached to one side using a ¼” seam. Press the seam.

Step 2
Trim this first log with the edge of the centre square, place another strip, right sides together, along the next edge, sew and press the seam as before.

Step 3
Continue to add strips, working around the square in an anti-clockwise direction until it is large enough to be trimmed down to 6.5” square. With my blocks, I found I needed to add two complete rounds to make the block big enough. When selecting strips for the “logs”, be sure to vary the width to add variation to your blocks. Make 9 blocks in this way.

Step 4
Using a ¼” seam, join the blocks together, first into 3 rows of 3, then join the rows together to complete the quilt top. Press well using a hot iron.

Step 5
Baste the quilt top using temporary fabric spray. Firstly, place your backing fabric, wrong side upwards, onto a table. Spray one side of the wadding with a light layer of adhesive and smooth onto the backing fabric carefully to avoid wrinkles. Spray the other side of the wadding and layer the quilt on top. Press lightly with a warm iron, taking care to avoid getting any residual spray on the base of the iron.

Step 6
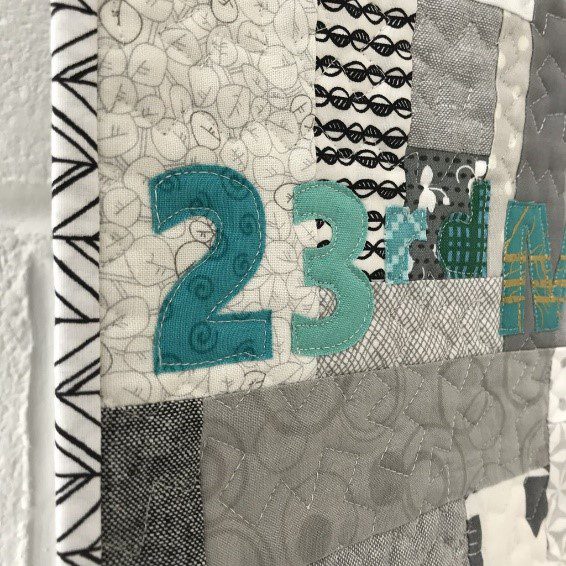
Next, prepare your appliqué shapes. Use a computer to print out the baby’s name and date of birth. You will also need a template of their hand print. The applique works best if a simple, clean font is used. My letters are approximately 1.5” tall. Cut out the templates and draw around them onto the paper side of your fusible web, remembering to turn them so the letters are reversed.

Step 7
Following the manufacturer’s instructions, fuse the web onto the wrong side of your coloured fabric scraps. I used a different colour for each letter but feel free to use what you have. Cut out the pieces with sharp scissors.

Step 8
Position the letters and handprints onto your basted quilt, using a ruler for accuracy if you wish. Again, following the manufacturer’s instructions, press each letter to secure it to the quilt.

Step 9
Attach the free motion quilting foot to your machine and lower the feed dogs. Stitch around each letter, securing your thread at the start by stitching on the spot for 2 or 3 stitches. Limiting the speed of your machine will give you more control and help you to achieve even stiches. Watch Nicholas demonstrating this step in the link below:

Step 10
Once all the appliqué is secure, quilt the background using free motion quilting. I used a meandering zig zag, but feel free to use whatever design you like. You can watch Nicholas free motion quilt the background here: https://youtu.be/z2NPVS49VZk

Step 11
Once the quilting is complete, trim the quilt to remove the excess backing and wadding.

Step 12
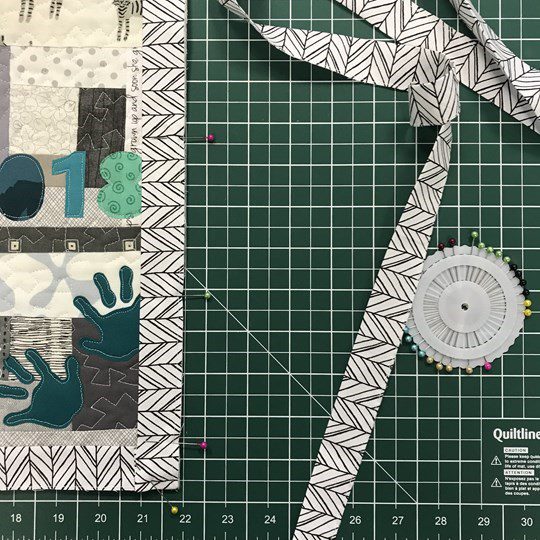
Cut your binding fabric into two 2 1/4” X WOF strips, join together using a ¼” seam and press in half lengthways. Use the binding to finish quilt, taking care to mitre the corners, either using machine for the front and back or finishing the back by hand.
And breathe...Your fabulous mini quilt is now finished!
Further information
Nicholas’ project is produced on behalf of Bernina. For more projects from Bernina visit them on Facebook, Instagram or Twitter @berninauk.